
Upload new waves without duplicating data
In a tracking study, every wave arrives as a new file. When you upload, DataLion recognises which waves the file contains and which are already in the table. If someone uploads the same wave a second time, the upload stops instead of doubling the cases. With Update with release you can also check the new figures in the dashboard before anyone else sees them.
This guide assumes the project already has data. The basics of uploading and the other update types are covered in Data updates.
Requirements
- DataLion release 2026.2.198 or later.
- An administrator account for the project.
- A column in your data that identifies the wave, or another unit of your uploads such as the country.
Set the partition key
The partition key tells DataLion how to tell uploads to the main table apart. Usually it’s the wave.
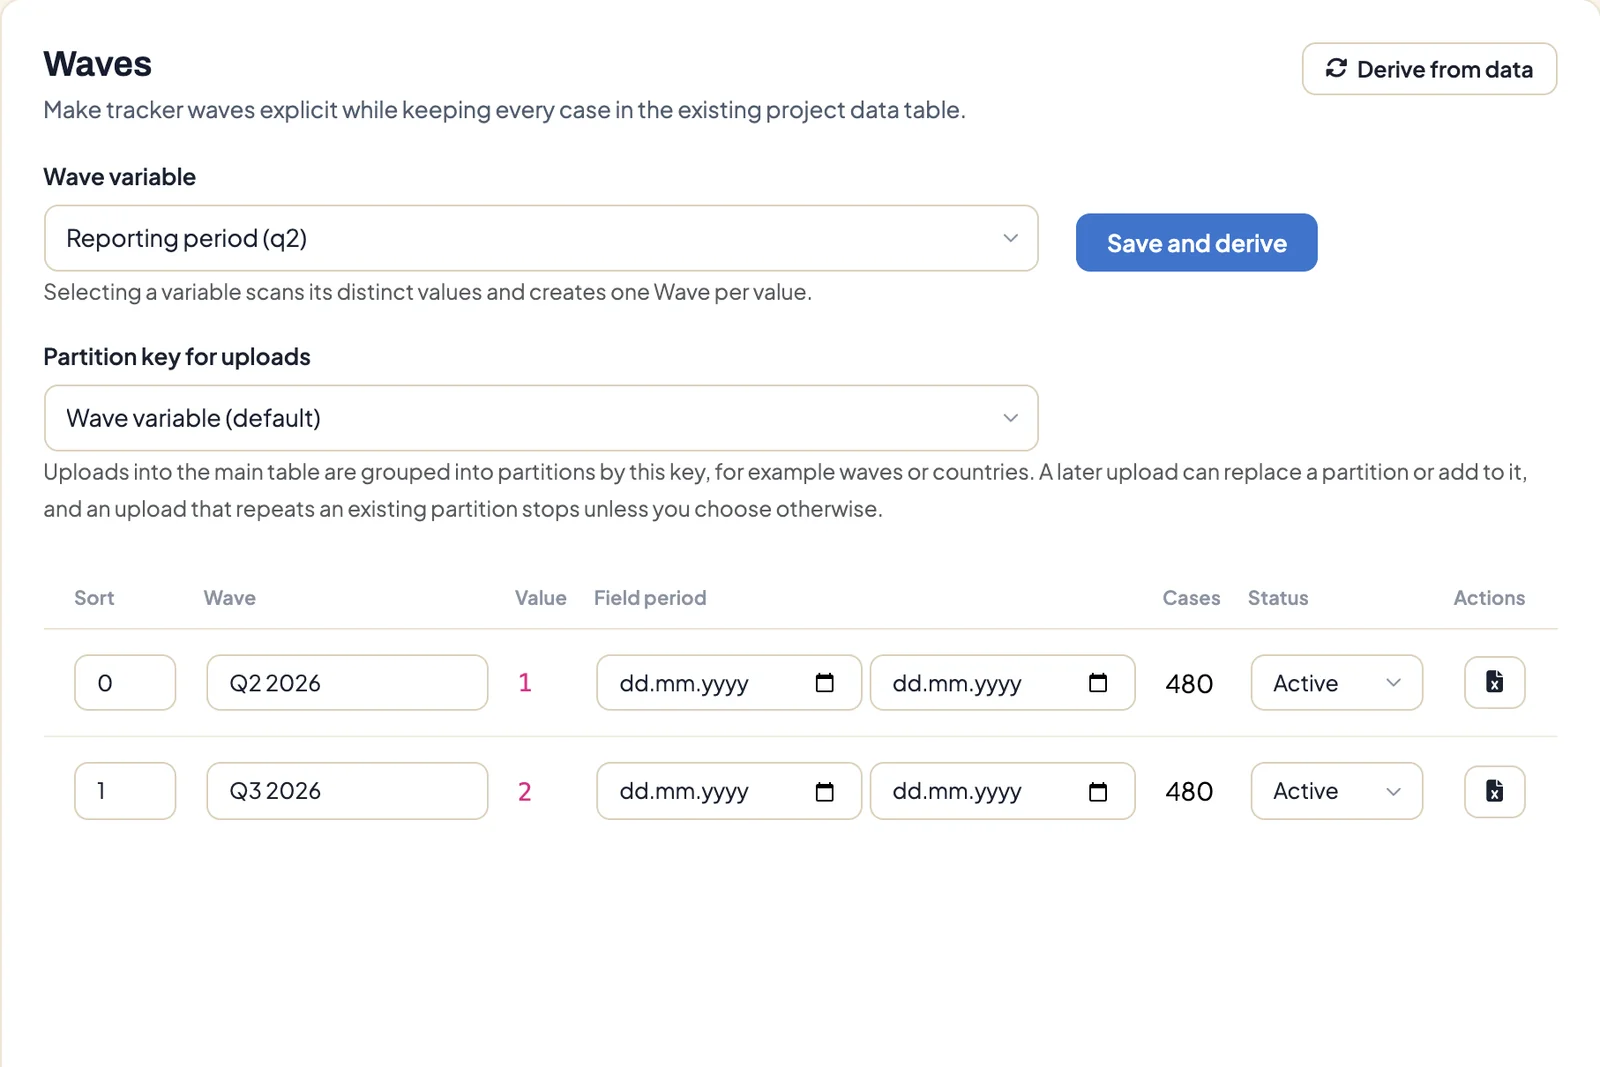
- Under Admin → Projects, open the project and go to Waves.
- Under Partition key for uploads, choose one of the options:
- Wave variable (default) uses the variable set above under Wave variable.
- Any codebook variable, for example the country, if each file holds the cases of one country.
- Technical upload column (dl_partition) if your data has no suitable column. You then name the partition yourself with each upload.
- Click Save and derive.
Partitions only apply to the project’s main table. Other data sources upload as before.
Upload a new wave
- Under Admin → Projects → Data Sources, open the main table.
- Under Data Upload, choose the file and click Save. DataLion accepts Excel, CSV, SPSS (.sav), Triple-S and IBM Dimensions (.mdd with .ddf), also zipped.
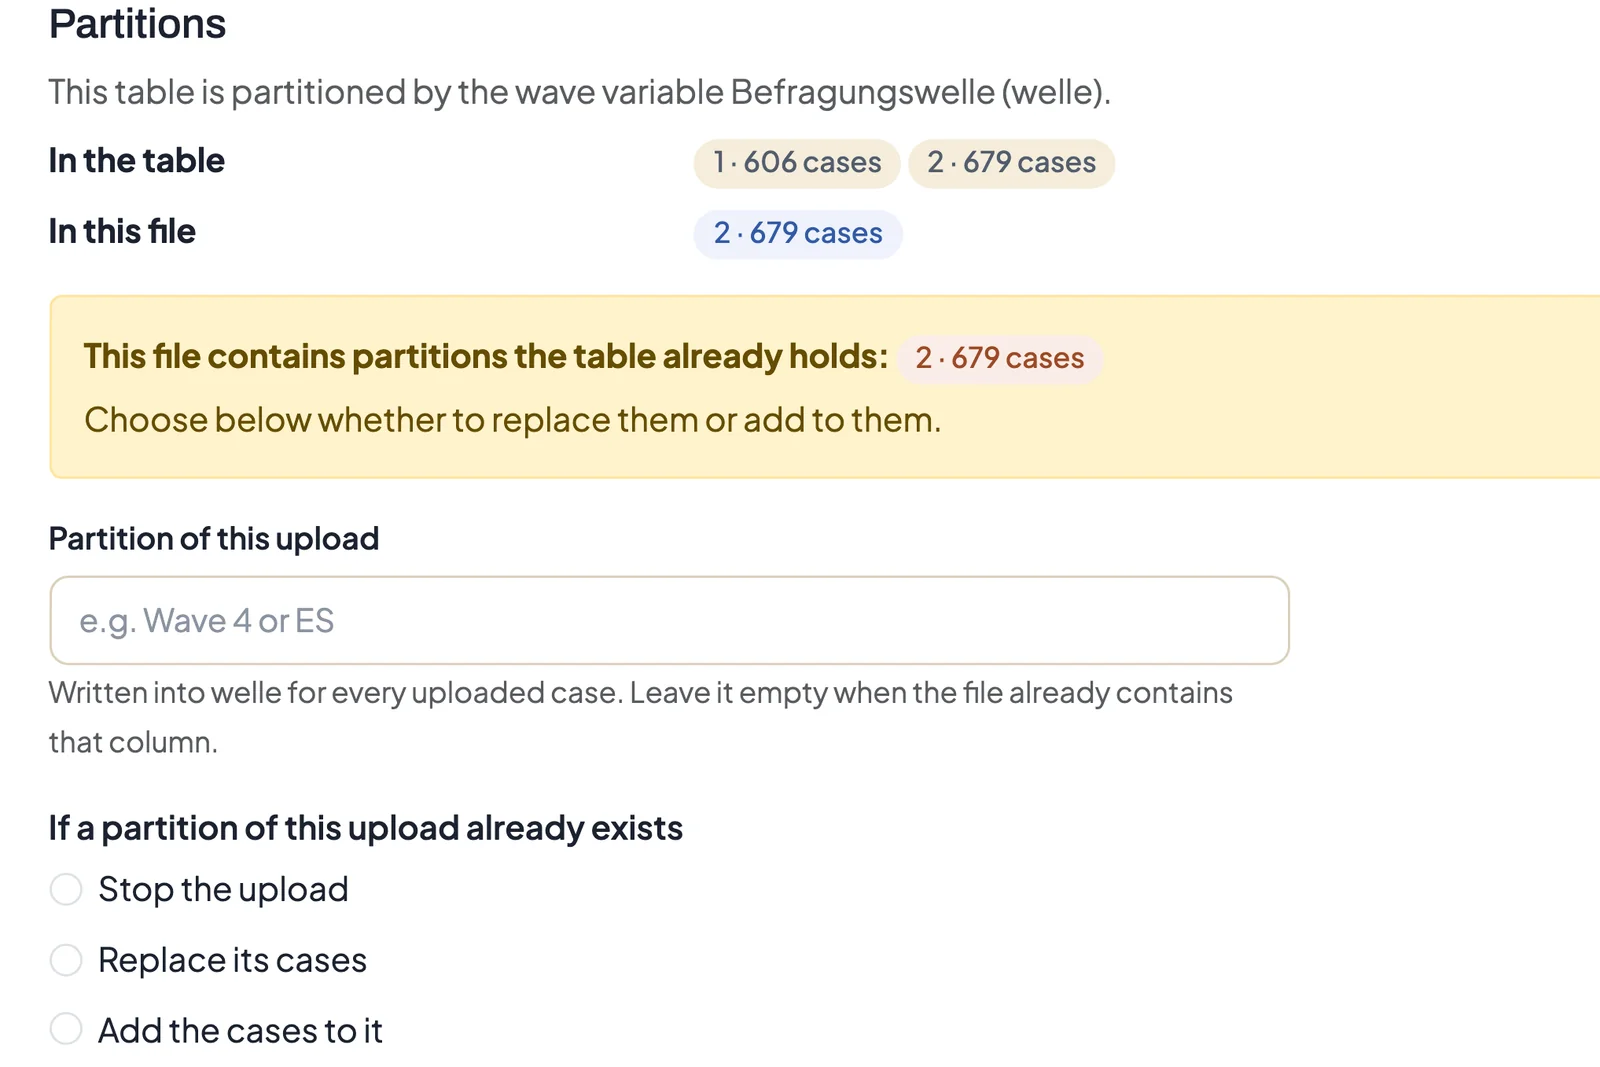
- In the preview, the Partitions section has two rows: In the table lists the existing partitions, In this file the partitions of the new file, each with its case count.
- Choose Append to data. Replace data would replace the whole table, and the partitions don’t matter then.
- Check Update strategy and How would you like to upload?, then click Save.
With Upload Now, the import runs in the background while a window shows “Upload is still running”. When it finishes, DataLion reports the number of uploaded rows and opens the data source again. Large files no longer fail on a request timeout. With Upload with notification you can leave the page and get a notification when the import is done.
If you work with the technical upload column, enter a name under Partition of this upload, for example “Wave 4”. DataLion writes it into every row of the file.
When the wave is already in the table
If the file contains a partition the table already holds, the preview says “This file contains partitions the table already holds” and names them. Under If a partition of this upload already exists, choose:
- Stop the upload: nothing is imported. This option is preselected. If the preview finds a partition that already exists, you have to pick one of the three options yourself.
- Replace its cases: the cases of that partition are replaced by the cases from the file, and all other partitions stay as they are. Use this when you deliver a corrected version of a wave.
- Add the cases to it: the new cases join the partition, for example late completes of a wave that is still in the field.
When replacing, DataLion imports into a copy of the table, which replaces the live table only once the import is complete. Dashboards therefore never show a half-replaced wave.
If an upload stops, DataLion reports which partitions were already there. Upload the file again and choose Replace its cases or Add the cases to it.
Exclude columns from the import
Serial numbers, technical fields or columns with personal data don’t need to end up in DataLion. In the upload preview, expand the Exclude columns section.
- Tick the columns the import should leave out. Columns that share a name prefix are grouped. The checkbox of a group excludes all its columns at once.
- The filter field searches by column name or label. Expand all and Collapse all open and close the groups.
- The section header counts how many columns are excluded. Import all columns clears the selection.
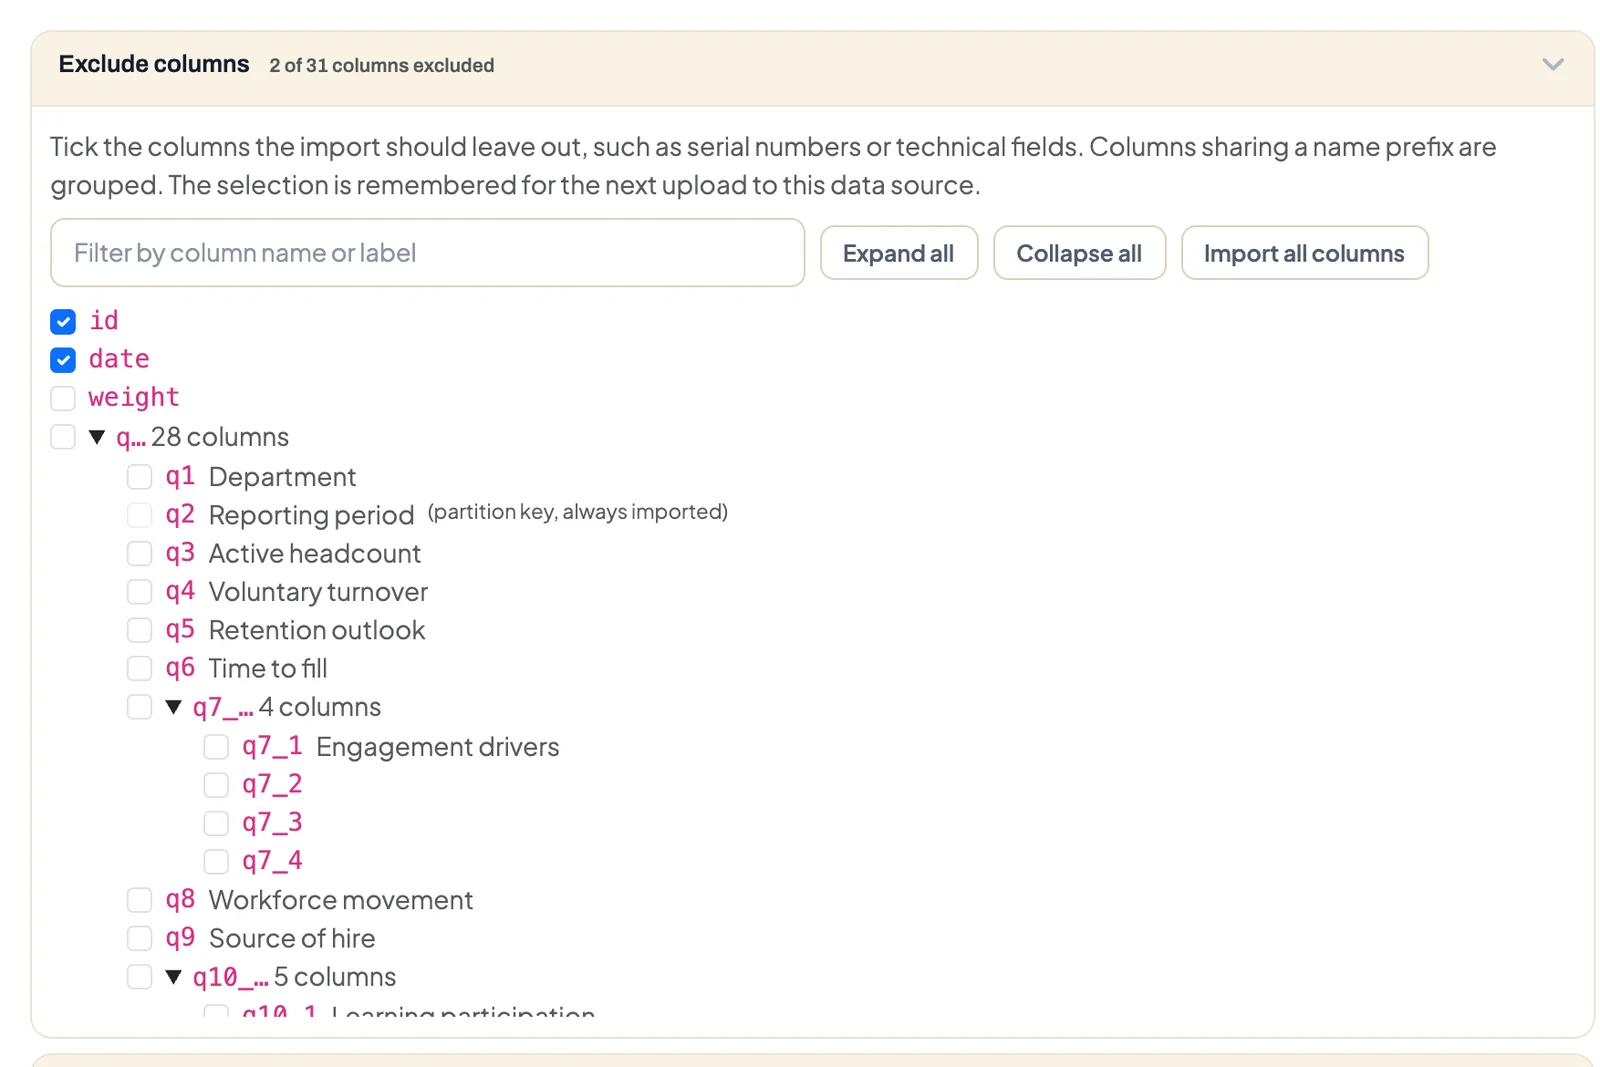
DataLion removes excluded columns from the file before the import. They reach neither the data table nor the codebook. DataLion remembers the selection for the next upload to the same data source. The partition key column is always imported.
Update with release
With this update strategy, only administrators see the new figures until someone releases them. Everyone else keeps working with the current data.
- In the upload preview, choose Update with release under Update strategy and upload. DataLion loads the data into a staging table.
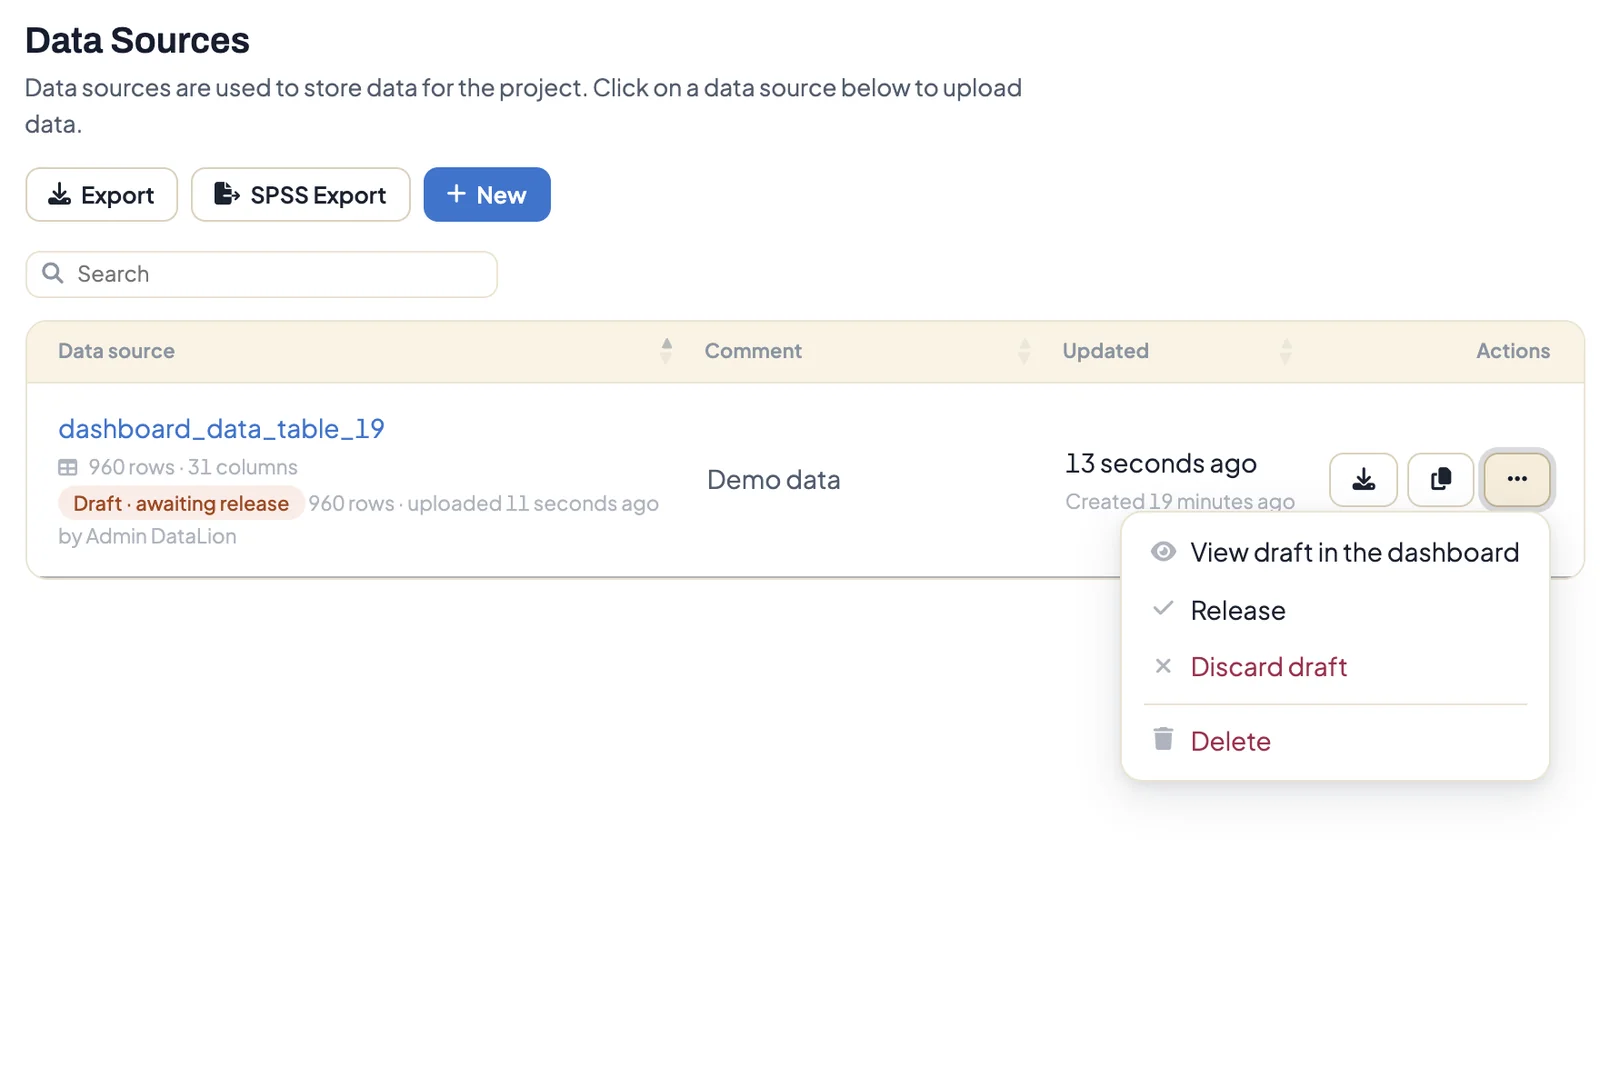
- In the list under Admin → Projects → Data Sources, the data source now carries the badge Draft · awaiting release, with the row count, the date and who uploaded it.
- Open the … menu in the data source’s row and choose View draft in the dashboard. You see the real dashboard with the new data and a “Draft preview” notice. The preview only applies to your own session. Show live data switches back.
- If the figures are right, choose Release. DataLion swaps the tables in one step, and the new data is live for everyone.
- If they aren’t, choose Discard draft. The draft and its staging table are deleted.
After a release, the previous version is kept as a backup until the next upload replaces it. Restore previous version brings it back. Re-activate released version then puts the released data live again.
While a draft is waiting, the data source accepts no further uploads. Release or discard it first. Automatic imports bypass the release, so use this strategy for manual uploads.
Add new questions to the codebook
If later waves bring new questions or answer options, you don’t need to regenerate the codebook. In the Codebook section of the upload preview there is the checkbox Add new questions and answer options to the codebook. It’s ticked by default as soon as the project has a codebook.
DataLion then adds new questions and answer options. Existing questions, answer options and IDs stay unchanged, so charts and filters keep working. After the import, DataLion reports how many questions and answer options are new. The option works for every file format, including studies from IBM Dimensions. It doesn’t apply when the codebook is regenerated or the update is waiting for release.
Align multiple-choice data and codebook
Multiple-choice answers come either as one comma-separated column (v_7 = “2,6”) or as one column per option (v_7_6 = 1). If file and codebook don’t match, fix it under Admin → Projects → Codebook in the Import and export area:
- Transform codebook to multi switches the codebook to the comma-separated column. The data stays as it is, and so do labels and option IDs.
- Transform data to single creates one column per selected option in the data (1 = selected, 0 = not selected) and maps the codebook row to it. The comma-separated column is kept. Future uploads must deliver these single columns or create them again. This transformation is only available for MySQL data sources.
Both actions first show a table with Before and After for each option.
Troubleshooting
- “The upload stopped because the table already holds these partitions”. The wave is already there. Upload the file again and choose whether its cases replace or add to the existing ones.
- “The file has no column …”. The file lacks the partition key column. Enter the partition under Partition of this upload.
- “A draft is already awaiting release for this data source”. Release or discard the draft, then the new upload works.
- “All columns of the file are excluded”. The remembered selection under Exclude columns is too large. Click Import all columns and choose again.