Data updates
To learn how to upload your data into a data source for the first time, see here. If you need help getting started with the project, you will find a detailed guide here.
There are several options for updating data in a data source:
-
Manual zero-downtime update (recommended; updates are loaded into a new data source and the data sources are then renamed)
Advantages:-
Backup of the data
-
No downtime of the dashboards
-
Data can be uploaded and only released later
-
-
Automatic zero-downtime update (recommended; updates directly in the data source by means of an automated upload procedure)
Condition: currently only possible with the upload setting “Replace table”
Advantages:-
Backup of the data
-
No downtime of the dashboards
-
-
Manual update directly in the data source (not recommended, as no backup is created)
Data can be imported directly into a data source and overwrite it or be appended to it. All the necessary options can be found below.
General procedure:
-
In the project backend → Data sources, click on the data source you want to update.
-
Under “Data upload”, click “Choose file” and select the file you want to upload.
-
In the comment field, you can enter notes about the version (e.g. updated on xx.xx.xxxx) to keep track of your data
-
Click Save to see the preview of your data
-
Select the desired upload settings
-
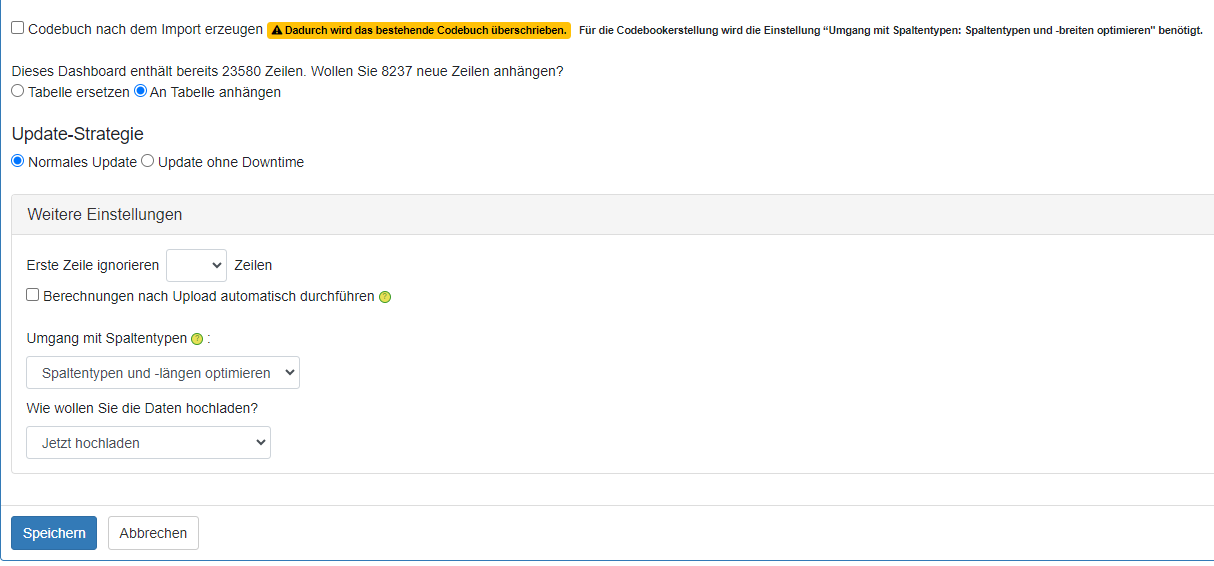
Only if you want to upload completely new data into a project can you select the “Generate codebook after import” option. Caution: This overwrites the existing codebook, which can no longer be restored! We therefore recommend that you download the codebook before the data update.
-
Update type:
-
Normal update (manual update)
-
Update without downtime (automatic zero-downtime update)
-
-
Update strategy
-
Replace table: The data already uploaded is overwritten by the new data. This option is needed when a complete dataset is provided with every upload.
-
Append to table: The selected data is appended to the data already uploaded. This option is needed when the uploaded data is to be supplemented, for example, with new monthly or quarterly data
-
-
The additional settings offer the following further options
-
Ignore first row
-
Run calculations automatically after the upload:
If you have stored calculations for this data source, you can use this option to have them run automatically after the upload. -
Handling of column types*
-
Optimize column types and lengths (default; usually correct): The optimal column types and lengths are optimized automatically
-
Optimize column lengths: only the column lengths are optimized automatically
-
-
Upload option “How do you want to upload the data?”
-
Upload now (default): the upload starts immediately. Suitable for smaller datasets
-
Upload with notification: the upload runs in the background and you receive a notification by email as soon as the upload is complete. Suitable for very large datasets (these should ideally be uploaded as a .zip file)
-
-
-
-
Click Save to start the upload
*More information on the handling of column types
-
Standard import:
-
Technical implementation: VARCHAR(255)
-
I.e. a field length of 255 is set for every variable
-
The overall limit of the column lengths is 65,535. This is reached at approximately 85 columns. E.g. 92 columns x 255 characters x 3 bytes => 70,380
-
-
Optimize column lengths:
-
Technical implementation: VARCHAR(width)
-
In the database, the field lengths are automatically limited to the actual column width
-
Example: The longest content of a column is “9999” —> The column has a field length of 4
-
This allows wider datasets and improves performance
-
-
Optimize column types and lengths:
-
Technical implementation: type(width)
-
In addition to the field lengths, the field types are also detected automatically
-
In the dataset, empty fields are automatically read in as NULL.
- Background: Numeric columns are created as numeric field types by “optimize column type”. For numeric field types, the possible values in MySQL are numbers and NULL. Unlike with other field types, there is no empty string. With numeric field types, an empty string is interpreted as 0. When excluding empty strings, 0 values would in this case be excluded from the calculations.
-
Example 1: A variable contains text such as Brand1, Brand2, Brand3. The variable type String (varchar) with a field length of 6 is detected.
-
Example 2, integers: A column contains only single-digit numbers. For this column, the variable type tinyint is detected. The field length is set to 4 (not to 1). This is because tinyint is a 1-byte integer. It can have values between 0 and 255 (i.e. a maximum field length of 3) or values between -128 and 128 (i.e. a maximum field length of 4). Tinyint automatically sets the field length to 4, because tinyint(4) requires the same storage capacity as tinyint(1) (1 byte).
-